Monday, January 30, 2012

Express Kit Monday - Revisted

Here we are, the last Monday of January. It's hard to believe the first month of 2012 is almost gone! February will be here in the blink of an eye. Today I just wanted to take a minute to revisit some of the beautiful projects we shared from the MemoryWorks Express Kit, "Smitten".


Remember, you can still purchase your own "Smitten" kit by visiting the MemoryWorks website. To join the MemoryWorks Express Kit family, contact your personal MemoryWorks Consultant (don't have a consultant? Find one HERE). Thanks for sharing your Monday's with me this month, I can't wait to share more with you this year!


Saturday, January 28, 2012

Creative Cards Saturday & A Scraplift

Hello again!  Jody here and I'm back for my second edition of Creative Cards Saturday.  I scoured the Memory Works consultant gallery for inspiration and saw so many that got my creative juices flowing!  Since my assignment is cards, I wanted a project that wasn't really a card but that I could use as a base for my card.  I found this great photo wallet project created by Memory Works Consultant Tammy Clecker.  I thought, "what a cute and fun birthday card that could be!" 


So, after Tammy kindly agreed to have her project used as my inspiration, here's what I came up with.  I made a fun folding birthday card.  Here are the dimensions;  cardstock base 10" x 5", scored at 1", 4" and 7".  All of the patterned papers inside the card are trimmed just short of  5" and 3".  The patterned paper band is about 2 1/2" wide and was made simply by wrapping a length of patterned paper around the finished fold out card and then secured after achieving the desired fit.

I used a mix of different paper lines including October Afternoon Sidewalks Theme, 100 Days of Summer Designer cardstock and stickers, American Crafts cardstock, Dear Lizzy Crochet Flowers & brad, Tim Holtz Distress Ink, Bo Bunny & Basic Grey alpha stickers and cute birthday greeting stamp.

Dress up the patterned paper band with a punched shape and other layers embellishments.  Don't forget to ink the edges for some added dimension.
When you first unfold the card, you'll see the gift card pocket revealed and the beginning of the birthday greeting.

Unfold the card some more for more fun embellishments and the rest of the birthday greeting.  There's still plenty of room to write a special message to the birthday boy or girl.

Supplies listed below.

Thank you for stopping by today.  Now, grab some cardstock, adhesive and paper scraps and make some cards today!  Feel free to stop by my blog, SpiegelMom Scraps, for more creative fun.
Happy Scrappin'!

Supplies 

Friday, January 27, 2012

Inspiration Friday-Journaling Jots

The product I wanted to highlight today are these fun Journaling jots that are part of the Simple Stories Elementary line. Of course you could use them for journaling on your pages but I wanted to suggest a few other ways to use them as well.


For this layout of my daughter's 100th day of school, I used some of the journaling jots as accents or embellishments. I grabbed a handful of them, lined them up, and then sewed them down to the page. I bent the tops and bottoms of the journaling jots just to add a bit more texture.


Supplies used: Simple Stories Elementary Teacher's pet paper, Elementary Report card paper, Elementary Journaling jots, Elementary Expressions Cardstock stickers, American Crafts Elementary coordinating cardstock pack, Ranger distress ink (vintage photo), sewing machine and thread


This would make a super easy gift to make and give. I simply wrapped a Hershey's candy bar up with cardstock, put a journaling jot on top and popped it up with a pop-up glue dot!!


Supplies Used: Hershey's candy bar, Elementary Bookworm paper, Elementary Journaling jost, Pop-Up Glue dots

For this card I used a journaling jot and just added a simple thank you greeting to it.


Supplies Used:American Crafts Kraft Cardstock, Elementary Flashcards paper, Elementary Report Cards paper, Elementary Journaling jots, Elementary Expressions Cardstock stickers, Sewing machine and thread

Hopefully this gives you some new ideas or ways to use up those journaling jots!!

Wednesday, January 25, 2012

"Challenge Me Wednesday"

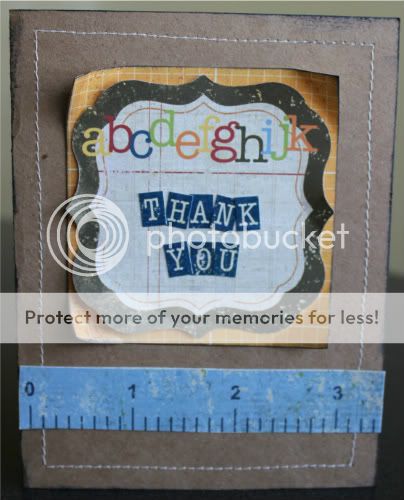
Happy Wednesday!  It's Lynn coming back to share some projects with you.  The first week in January I announced the "Mix It Up!" Challenge at the MemoryWorks Studio for consultants.  Well, our creative peeps have been doing just that!  The idea is to use at least 3 products from 3 different manufacturers to make a card, layout, or altered item.  First, I would like to share this card made my Karen Seifert.
I love this mix of neutrals, grounded by the black matting that brings it all together.
Here are the products Karen used:
1.) Journaling boxes top middle are Simple Stories Generations 6 x 6 paper pad SS1801
2.) Background paper and middle strip is My Minds Eye Sunshine 6 x 6 paper pad MME030
3.) Happy B'day stamped on My Minds Eye Rosy 6 x 6 paper pad MME025
4.) Baker's Twine Primary WR033
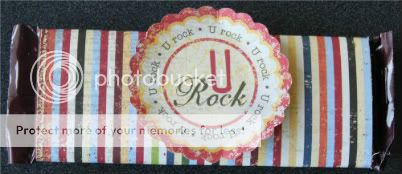
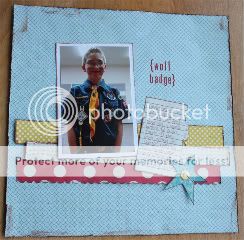
And now, a layout from TeamWorks member, Kim Hill.

I just love how the bright colors contrast with the black/white stripes and frames.
It's a great mix, don't you think?
Here are the supplies Kim used:
My Mind's Eye: striped paper (Lost & Found); orange flag (Stella Rose)
Simple Stories: red ribbon (Christmas); date tag, "live now", "loving life", and "for the record" (Year-o-graphy)
Echo Park: yellow gingham paper (For the Record); picture frames (Times & Seasons)
Crate Paper: floral paper (Farm House)
Cosmo Cricket: buttons (Upcycle)
Pink Paislee: lined paper for journaling box (Vintage Vogue)
Authentique: orange woodgrain photo mats (Splendid)
Thanks for joining us today.  MemoryWorks consultants, you  have less than a week to join us in the challenge!  Hope you are all inspired to check your stash and "Mix It Up!"

Monday, January 23, 2012

Express Kit Monday: "Smitten" Projects

A new Monday and a new chance to share some incredible pieces created using the January MemoryWorks Express Kit, "Smitten". This kit has me ready to celebrate Valentine's Day with all the people I love.

These wonderful projects were created by TeamWorks Member, Janey Pumphrey


This adorable card was created by TeamWorks Member, Jean Bidwell-Edwardson


And last, but certainly not least, a beautiful layout from TeamWorks Member Lacey Igo


Thank you for such amazing inspiration this month everyone! I hope you all have found the inspiration you need to have a truly "Smitten" Valentine's!


Saturday, January 21, 2012

Creative Cards Saturday

Howdy Scrappers!  It's Jody here and I'm happy to be hanging out with you for Creative Cards Saturday.  This is my first assignment as a Design Team member and I'm super excited!  I wanted to share some easy ways to add texture to your projects without adding too much bulk.

Now if you're like me, you don't want your special cards to get ruined while traveling via the USPS (U.S. Postal Service), right?  Right!  The rule of thumb for the USPS is the envelop has to fit through their little thickness tester, which is a quarter inch slot, in order for there NOT to be any extra postage charge for a thick envelop.  This quarter inch of space also allows for the envelopes to be fed through the machine without being damaged.  Sometimes I feel like the Post Master at my local Post Office grabs that darn thing as soon as he sees me walk in!

Solutions! One way to add texture without adding all that bulk is to use burlap string or bakers twineMemory Works carries the WRMK Bakers Twine in wide variety of colors, along with the awesome Sew Easy ToolYou'll also find burlap string in some of the monthly Express Kits.  This small addition can add a nice touch of texture and depth to your cards and other projects.

A second way to add dimension is by using 'pop-dots.'  I used the American Crafts Dimensional Tabs to give my punched cloud element a little lift off the card.  I also inked the edges to give them more definition.  I used both techniques on the card below.


Hint: When tying a knot or bow with burlap string or baker's twine, put a small dab of Glossy Accents onto the center and your bow or knot won't come loose. 

Another great way to add some texture and shine to your cards, or any other project, is by using Ranger's Glossy Accents.  Just use the bottle tip to dispense a small amount onto a die cut (or hand cut) element, sticker, stamped image, flower or whatever your heart desires.  Glossy Accents dries fast and adds a pretty shine to spice up your project.  You can also use Ranger's Crackle Accents for a unique cracked effect as well.  Did you know that Glossy Accents is a super strong adhesive also?  This great product can do some serious double duty as a part of  your scrapping supplies.  I can't scrap without it! 


My hand cut banner before Glossy Accents.

After Glossy Accents
Another way to add some texture is to curl the edges of your paper.  I love this technique and use it to add a vintage feel to my projects.  All you need is a little water and your fingers!  I used my aqua pen to run some water along the edges of the paper,  then used my fingers to gently curl the paper.  So simple! 

**I used a card sketch for this card from Let's Scrap. (sketch  03-16-11)


You can see the Crackle Accents used on the flowers.

Here are my Memory Works supplies:


Other supplies: Fiskars Cloud Punch & ATG Gun.

Thank for stopping by today and hope you'll use some of these easy techniques on your next projects.  Please stop by my blog, SpiegelMom Scraps, for more pictures.

Happy Scrappin'!

Friday, January 20, 2012

Creative Friday

Hello!! I'm Caroline Piercy and I am excited to be a member of TeamWorks this year. Today I'll be sharing a little bit about me and a few projects as well. I live in a small farming town in Royal City, WA. My husband farms and does construction and I am a Stay-at-home mom. We have 4 kids that are 9, 7, 3, and 1 who keep me plenty busy and who are the subjects of the majority of my scrapbook pages. I have been scrappin' off and on for almost 15 years now. I love the creative process of scrapping and love to watch my kids look through their albums too. I am more of a simple scrapper and tend to use a lot of distressing, inking, and sewing on my layouts. I also love to read, sew, quilt and cook/bake for the family. I'm looking forward to a great scrapping year in 2012 and hope that you are too!! My projects today are both from Lily Bee lines, one of my favorite scrapping companies. Both are of my oldest son, Tyler, on some of his adventures!

Supplies used: Lily Bee Memorandum papers, Lily Bee Memorandum Index Cards, Ranger Distress Ink-Vintage Photo, American Crafts Chestnut pen, Making memories silver brad

Supplies used: Lily Bee This & That papers, Lily Bee Memorandum Index Cards, Lily Bee ABC stickers, American Crafts white cardstock, Ranger distressing ink-Vintage photo, American Crafts chestnut pen, Yellow button, twine, Stampin' Up! scallop punch


Thanks for taking a look and hope you have a great weekend!!

Caroline

Wednesday, January 18, 2012

Mixing It Up with the January Challenge

HELLO fellow scrappers and greetings from frigid NYC. I am so very excited to be part of this year's TeamWorks Team. Today is my turn to share my creation for Challenge me Wednesday.

I really enjoyed this challenge because it got me thinking about using my stash a bit more. It's also the reason I love the MW Express Kit subscription. It allows me to be more versatile in my creativity and utilize products from a host of  manufacturers.

Below, I introduce you to my muse, Mr. Ethan. He is being raised in front of the camera. Except for some very few moments of moodiness, he is always ready to say cheese. If you attended the MW retreat in June 2011, then you will remember this adorable apron we all got. Ethan wants to know why I use it at my table instead of in the kitchen and then asked if he could borrow it so that he could be a "chef-cooker" with his dad. How could I say no to that?


Supply List:
Simple Stories - Yearography Newsprint
My Mind's Eye - Lost and Found 2 Everywhere
October Afternoon - Clothesline
American Craft - Thickers
Embellishments came from various Express Kits


Enjoy.
Rosann

Monday, January 16, 2012

Express Kit Monday: "Smitten" Projects from the TeamWorks Team

We hope you are all enjoying your MemoryWorks January Express Kit, Smitten. Last week we shared several projects created by the MemoryWorks Home Office and today we have several projects from our TeamWorks Team to get your creative gears turning.

TeamWorks Member Sharon Hill

"All Decked Out"

"Love"

"Love Postage"

"Love Scrabble"

"Love You"

Mini Picture Frame

"My Love"

"True Love"
TeamWorks Member, Jade Wilson

"True Love Treat Bag"

"What I Love About You"

"Love"

"Stamp of Love"

"Scrabble Love"

"Happy Valentine's Day"

"XOXO"
Be sure to join us next Monday when we share even more projects from the MemoryWorks January Express Kit, Smitten!