Monday, November 23, 2009

Now that you have all of your holiday shopping done (hehe), your lists are made, plans are on your calender, it's time to send out the cards. What should you do? There are so many choices. You could buy your cards but what fun is that? A homemade holiday cards is such a wonderful way to share the holidays with those near and far. For inspiration, I am sharing with you, cards created from the Memory Works November Express kit by one of our many talented MW consultants, Rhonda Streff.


Arent these the best. Just think how happy and impressed the recipient will feel when they open the envelope to these beautiful cards. I'm going to start mine now so I get them out on time, how about you?


Happy Scrapping


Holiday Helpers

Christmas is one month away. So it is that time to make wish lists and go shopping. And especially now since Black Friday is this coming Friday already! What better way to be prepared for shopping than to make your own wish list/planner to give to family and friends as well as keeping one for yourself. You will have all the wish lists that everyone filled out in one place along with receipts of purchased items and gift cards purchased for someone. In the MemoryWorks Idea Gallery, there are a few excellent projects that were created by 2 consultants, Lynn Darda and Christina Steeves. Their projects are very useful for the holiday season.


Lynn covered $1 notebooks with paper and embellishments from My Mind’s Eye. For the first set of notebooks, Lynn used the papers and embellishments from the Colorful Christmas Theme Set and Glittered Chipboard. The second set of notebooks, Lynn used the papers from The Merry Days of Christmas Theme Set. She also used Tim Holtz Adage Tickets on the second set of notebooks. I think the tickets go great with that paper.

"Altered Notebooks" by Lynn Darda
Lynn Darda Altered Notebooks 1Lynn Darda Altered Notebooks 2


Christina used BoBunny’s Tis The Season Theme Set and Rub-ons. I LOVE this collection by Bobunny. And I love what Christina make from this collection.

"Christmas Planner" By Christina Steeves
Christina Steeves Christmas Planner 1Christina Steeves Christmas Planner 2Christina Steeves Christmas Planner 3Christina Steeves Christmas Planner 4

Christina used My Mind’s Eye Merry and Bright Theme Set and American Crafts Thickers to make this project.

"Christmas Wish List Holder" by Christina Steeves
Christina Steeves Christmas Wish List Holder 1Christina Steeves Christmas Wish List Holder 2Christina Steeves Christmas Wish List Holder 3Christina Steeves Christmas Wish List Holder 4

These ladies show their creativity by making different versions of these Christmas organizers. Way to go Lynn and Christina! They did an awesome job on their projects for Christmas. So since Christmas is one month away, you better get "planning".
MemoryWorks Idea Gallery

Happy Scrappin'!

Signature resized smaller

Monday, November 16, 2009

With the Holidays upon us, there are so many Craft Sales, Bazaar's and Home parties. Some of you have probably wondered what is the best way to display your Memory Works products? The solution; Creating a Memory Works Product Display Board. I had to share with you, a fantastic Diaplay Board created by Memory Works consultant, Nicole Quinn. To do this, Nicole used 12 different MW product lines. She used a 12 x 12 cardstock base and three small squares of coordinating paper along with one or two samples of matching embelishments. Along with her display board she included framed layouts . What a beuatiful presentation this makes, sure to draw customers. Great job Nicole, thank you for sharing your talent. I am heading home to create my very own Display Board

Add Image


Happy Scrapping

Saturday, November 14, 2009

Poinsettia Bouquet Instructions

I know I am a day late with this. I worked yesterday (I'm normally off) and what was supposed to be a half day turned into a full day. When I got home I fell asleep for 4 hours. Then I woke up and went to bed. But here are the instructions I promised to post. Better late than never!:)

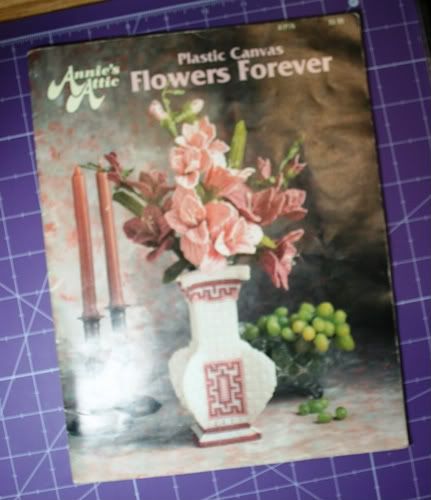
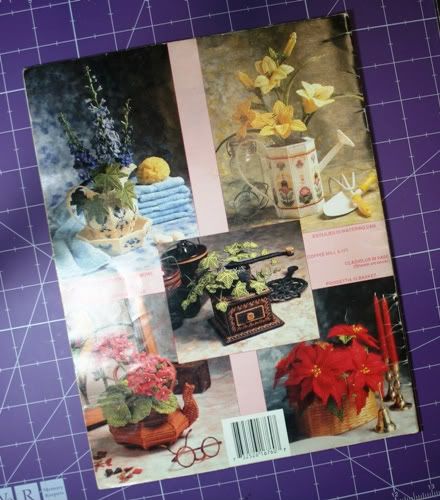
Note: I made these flowers from a pattern I have for Plastic Canvas. (back cover lower right corner: Poinsettia made in Plastic Canvas). This goes to show that you can use any pattern for papercrafting.
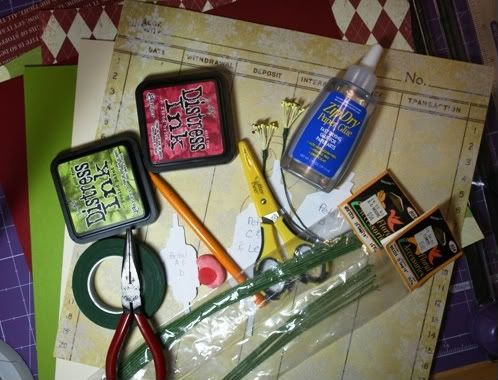
Front CoverBack Cover


Supplies Needed:
MemoryWorks Products:
--Red and Green Pattern Paper of choice and/or Cardstock
(I used Prism Cardstock in Blush Red Dark and Intense Kiwi for the flower in the instructions)
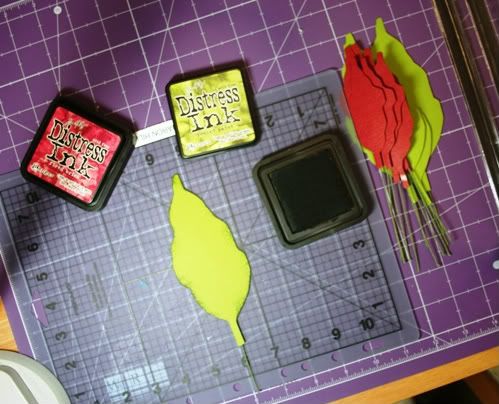
--Ranger Ink Distress Ink in Fired Brick and Peeled Paint
--Zip Dry Glue
--Scissors
Non-MemoryWorks Products:
--20- and 24-gauge Floral Wire (optional: 28-gauge Floral Wire for wrapping petals to stem)
--2 Stamens (found in floral department)
--Floral Tape (Green)
--Styrofoam Block (to fit basket)
--Basket of choice (or you can make a basket like I did using Pattern Paper and/or Cardstock)
--Wire Cutters
--Pencil and Eraser
Optional:
--Clear Marbles (found in floral department)
--Spanish Moss (found in floral department)
--Cellophane Wrap

Poinsettia Petals and Leaf Patterns
The best way to keep the pattern of the petals in their true size, save this photo on your computer and then print it out to fit 8 1/2" X 11" paper.

Step 1: Gather supplies and cut out patterns.Photobucket

Step 2: Using a pencil, trace petal and leaf patterns on back side of paper/cardstock. For small flower, you will need 3 A petals, 5 B petals, and 4 leaves.

Step 3: Cut out all petals and leaves. Run an eraser over edges to erase any pencil marks that are left.

Step 4: Cut a 6” piece of 24-gauge floral wire for each petal and leaf.

Step 5: Glue 6” piece of floral wire to back side of each petal and leaf. (Note on pattern: dash/line on petal and leaf patterns indicates where the end of the wire should be placed.)
Photobucket
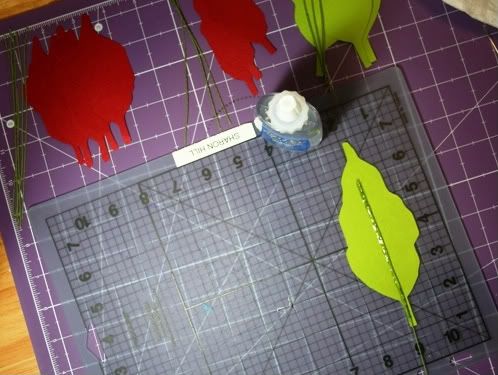
Be sure to press wire into glue.

Step 6: While the glue dries, make a stem by attaching 2 stamens to 20-gauge floral wire. To do this, cut 20-gauge floral wire into 9” piece. Take the 2 stamens and place 9” piece of wire between them.Step 6a
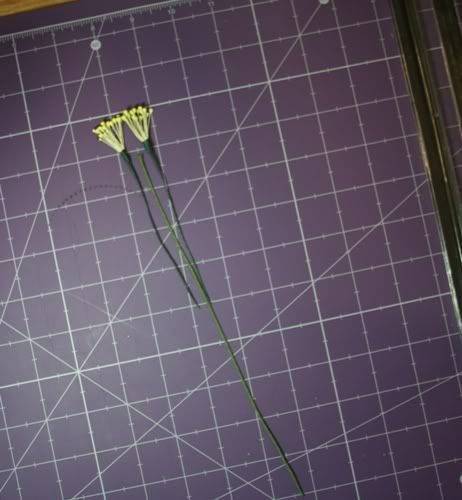
Twist stamens wires around the 9” piece of floral wire. (Or use a small piece of 28-gauge floral wire to wrap around stamens.)Step 6bPhotobucket
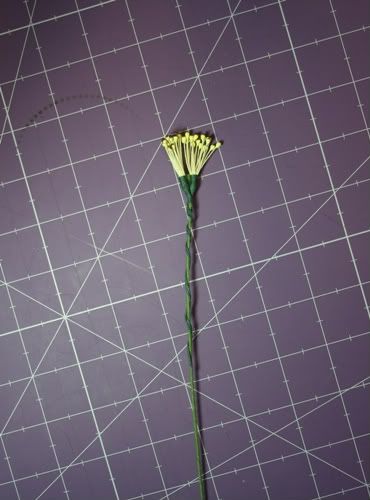
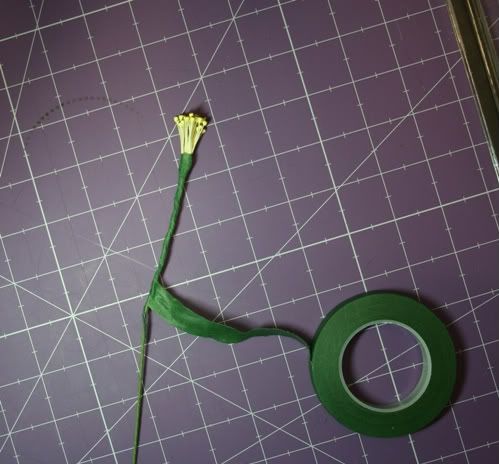
Starting at the top of the wire and bottom of stamens, wrap floral tape around stamen wires.Photobucket
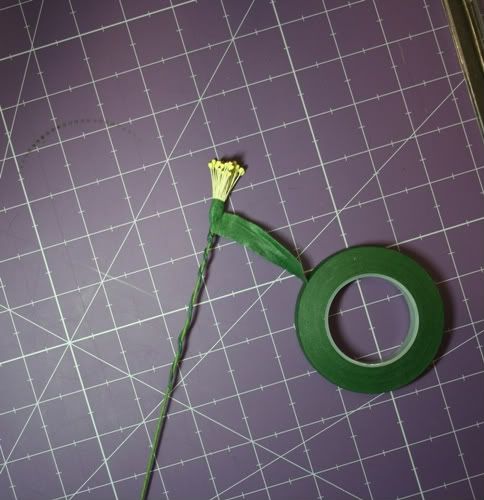
Wrap twisted wires with floral tape and cut off tape.Photobucket

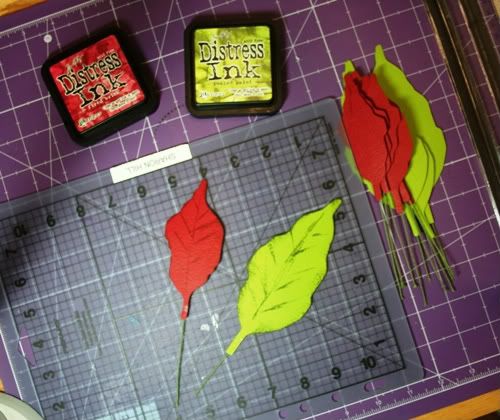
Step 7: Once glue is dry and wires are attached securely to petals, ink edges of petals and leaves.Photobucket

Step 8: (Optional) for a more realistic look, use the edge of ink pad to draw lines on petals and leaves for veins.PhotobucketPhotobucket

Step 9: Bend/curl petals to shape. (You can do it as you add the petals to the stem.)Photobucket

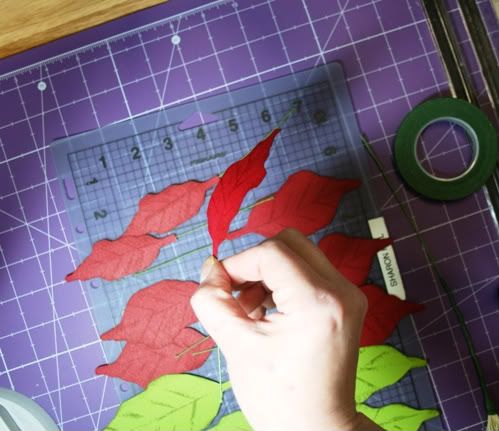
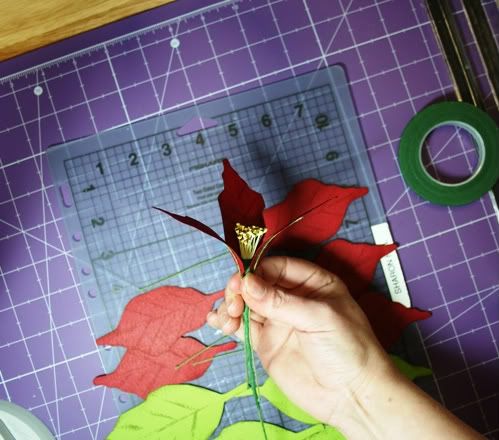
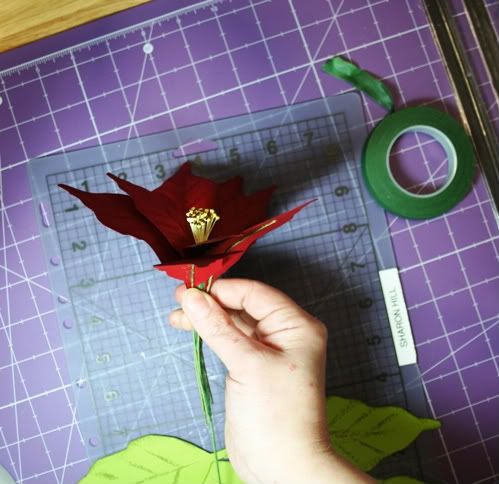
Step 10: Now to start assembling the flower. For the small flower, place the 3 A petals around the bottom of stamens.Photobucket

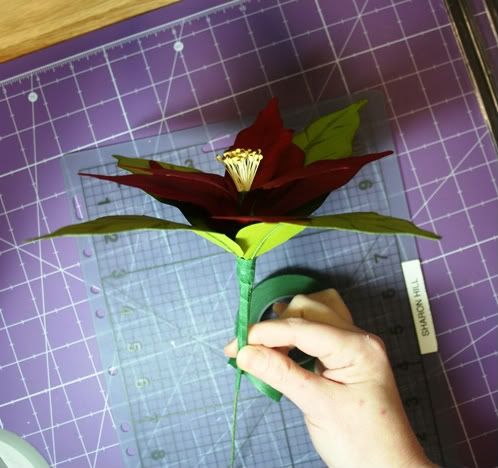
Step 11: Starting under the petals, wrap wires with floral tape. (Optional: use a small piece of 28-gauge floral wire to wrap around petals and leaves. Then wrap with floral tape.)Photobucket
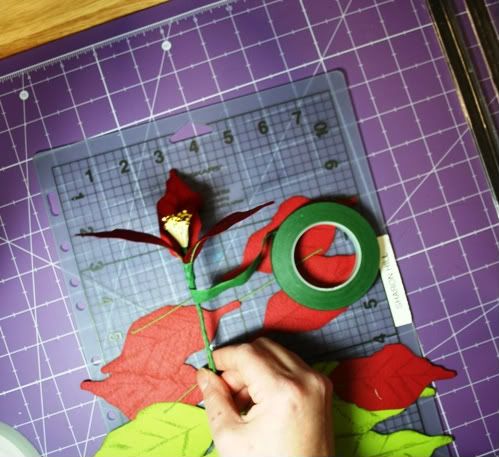
Wrap tape the whole length of the petal wires. Break off tape.

Step 12: Place 5 B petals around stem about ¼” below the bottom of the A petals on the wire stem.Photobucket

Step 13: Starting under petals, wrap wires with floral tape the whole length of the petal wires.
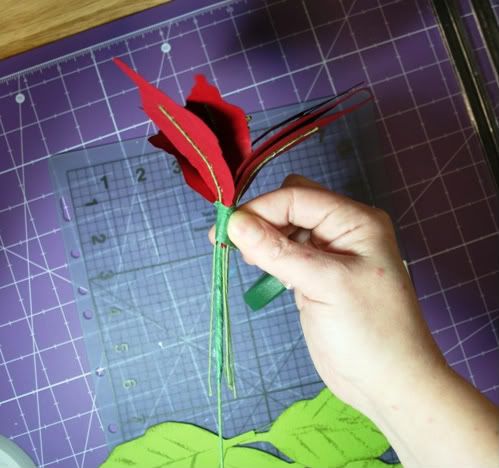
Photobucket
Break off tape.

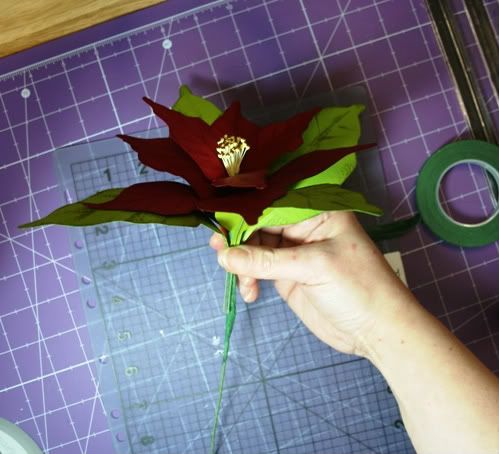
Step 14: Place 4 leaves around stem about ¼” below bottom of the B petals on the wire stem.Photobucket

Step 15: Repeat step 13.Photobucket
Wrap tape all the way down the stem (to the bottom of the stem). Break off tape.

Step 16: Bend petals and leaves to shape as desired. (before I placed flower in basket, I bent/folded over the stem wire upwards.)Photobucket

Step 17: For larger flower, repeat steps 1 – 9. (For step 2, you will need 3 A petals, 5 B petals, 3 C petals, 3 D petals, 3 E petals, and 4 leaves.)(Each of the different sized petals can be done using different paper like I did with my bouquet. If using cardstock, you would need 6 A petals, 5 B petals, 6 C petals, and 4 leaves.)

Step 18: Assembling the large flower, repeat steps 10 – 13 for assembling small flower.

Step 19: Place 3 C petals ¼” below B petals and wrap with floral tape.

Step 20: Repeat step 19 two more times by placing 3 D petals and then 3 E petals on the stem.

Step 21: Repeat steps 14 – 16.


You can make an arrangement out of these by placing a Styrofoam block in a basket and cover it with Spanish Moss before placing flowers in basket. For my arrangement, I used a template to make a basket out of patterned paper and cardstock. I took a piece of cellophane wrap and placed it in the basket. I placed the Styrofoam block in the middle of the wrap and placed clear marbles (found in floral department) in the wrap around the Styrofoam. This hides the Styrofoam and adds some stability to the basket/arrangement. I tied a ribbon around cellophane wrap (be sure to leave a small opening for flowers to go in). I then placed my flowers in the basket and arranged and shaped flowers as desired.
Nov09 MWE Kit Poinsettia BouquetNov09 MWE Kit Poinsettia Bouquet Side

Happy Scrappin'!

Signature resized smaller

Tuesday, November 10, 2009

Bah Humbug!

Well, that is not how I would describe the MemoryWorks November Express Kit anyway. I would describe it as Fabulous! It truly is because I got to play with it already. I had fun with this kit. I was inspired after the sneak peek of the kit came out. And with what I made, I am surprised by what else I was still able to create with what was left of the kit. After you see my first project, you will understand why I say that. Because at least half of the kit went into making my first project alone. And then I was able to create 3 layouts along with 5 cards from this awesome kit. The reactions that I have gotten from people who have seen my first project speaks louder than words. And the reactions were literally jaw dropping, gasps, and wide eyes in amazement. So I know you are wondering, what is this project you are talking about? What did you make that amazes people? Well, I won't keep it from you any longer.


"Poinsettia Bouquet" by Sharon Hill


Nov09 MWE Kit Poinsettia Bouquet Top

"Poinsettia Bouquet Basket" by Sharon Hill

Photobucket

"Home for the Holidays" Layout by Sharon Hill

Photobucket

"Believe" Card by Sharon Hill

Photobucket


So there you have it. To make the petals and leaves, I used a pattern that I have to make the same bouquet out of plastic canvas. This goes to show you that any pattern can be used for scrapbooking and papercrafting. There are more photos of the Poinsettia Bouquet from different angles found in the Idea Gallery on the MemoryWorks website. You can also see the rest of my layouts and cards there as well along with other projects that fellow team members have created with this kit thus far.

To see more photos, go to www.memory-works.com, click on Inspiration. The Idea Gallery can be found there or by clicking here.

Happy Scrappin'!

Signature resized smaller